Saturday, 5 September 2020

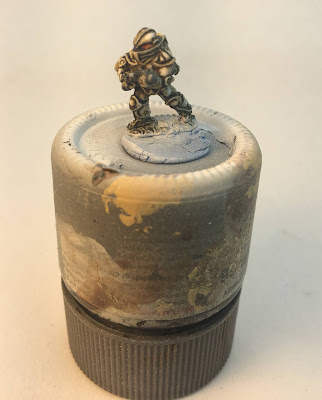
15mm Sci Fi - Alternative Armies Laserburn Imperial Blackguard

 August was a month of few blog posts but a lot of painting.  To be honest, I am a lazy blogger; photographing my collection and projects always takes a back seat to painting.  That being said recording my exploits does help me in the long run since I tend to forget what and how I painted models.  This journal helps keep things straight.

This week I managed to finally bang off my Imperial Blackguard troops, manufactured by Alternative Armies.  In September I need to do a parade photo shoot of my Imperial Assault Group, some 100+ strong, including Power Armor, Dreadnought, vehicular armor and Blackguard support.  

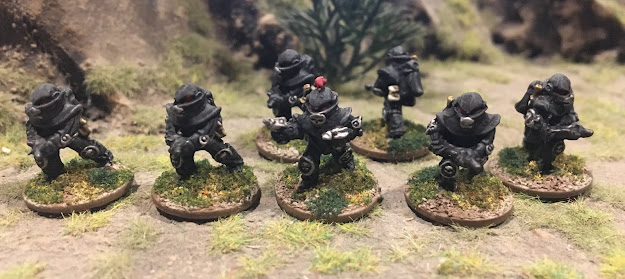
In Laserburn, Blackguard are fielded in small units of 5 men.  Their preferred fighting style is to close with their enemy and fight with fist and force sword.  Their fighting stats are the best in Laserburn, and make Warhammer 40K Space Marines look like chumps.  This week I banged of 15 of them.  Total painting time: 2 hours.


Laserburn Imperial Blackguard

The Blackguard were incredibly easy to paint.  They did have some significant mold line on the helmet which needed cleaning up.  Once ready I decided to go with a classic Blackish armor scheme which complements my red Imperial troops(which I need to photograph since they have all recently been redone)
  • Armor: Tamiya German Grey basecoat, followed by a light drybrush of Reaper Snow Shadow.  
  • Laser Pistols and Skulls: Vallejo Steel 
  • Bolters: Vallejo Black Metal 
  • Pouches: Reaper Driftwood Brown 
  • Sword hilts: Vallejo Gold.  
  • Visors: Tamiya Clear Red
  • Plumes: Vallejo Flat Red (one in yellow, cause why not)
Laserburn Imperial Blackguard

The models were then washed in Army Painter Dark Tone Wash.  Tamiya German Grey and Dark Tone wash create a very nice black armor effect which avoids the stark nature of painting pure black (pure black armor is just not effective visually).  Pouches were highlighted with Vallejo Sand ivory and the visors were given a coat of Vallejo Carmine Red to bring them out more.  

Overall I am pleased with these models.  They are easy to paint and have a suitable look which can be used for either good or bad guy forces.
Wednesday, 5 August 2020

15mm Sci Fi - GZG Free Cal-Tex

Ground Zero Games has a vast miniature range, both in 25mm and 15mm.  Sadly, for this very reason there are often few photos of some of the older miniatures in their collection.  This can result in a consumer passing those products by since they have no idea what they actually look like.  There are some photos scattered across the internet of these older models, but they are few and far between.  The 15mm Free Cal-Tex models fall into this category.

I originally purchased one pack of these some time ago for a trial run.  As usual, I was not disappointed.  There are only two packs in the range at the moment: a full combat squad with support weapons and another pack with kneeling and prone troopers.  The combat squad contains a leader, four riflemen, a sniper, an RPG gunner and a SAW gunner., all sculpted with light/medium armor.  They initially reminded me of old 1990s 40K Cadians and the alien soldiers from the 1980s TV series "V".  Today I painted another two squads, bringing my force up to 24 troops total.  The figures are heavily armed, including side arms and combat knives.  There is a lot of detail on these guys.


These troops were slotted to an unfilled role in my DPRG force: Special Recon Troops.  They looked particularly sinister and I felt they would fill that role nicely.  Special Recon troops carry out Counter Insurgency operations, sabotage and terror operations against the Republic of Arden. Armed with AK-400s and the Brazilian Destruidor-3 Launcher and Raio Gauss Sniper Rifle they can hold their own against intervening American marines.

They were painted in the same colors as the DPRG regulars (done almost 10 years ago now).


  1. Tamiya Flat White Primer
  2. Vallejo German Uniform (airbrushed on)
  3. Reaper Terran Khaki fatigues, highlighted with Reaper Khaki Highlight.
  4. Weapons - Reaper Afterburner Grey
  5. Belt Pouches - Vallejo German Bright Green Camo
  6. Helmet Visor - NATO Black, followed by layering of Reaper Red Brick, Deep Red and then Blood Red as a highlight.
  7. Washed in Army Painter Strong Tone Dip
  8. Light drybrush of Vallejo German Uniform to bring out the details on the armor and helmet.
Note that I did not paint these chaps in the same style as a do now: with extreme highlighting.  I wanted them to blend into my DPRG force so I used the same technique I did 10 years ago.  Sadly they look better in photos and up close than at gaming distance.  At a distance, 3+ feet, they are just brown blobs (as I knew they would be).  Perhaps it is my poor eyes.


The current range does not have any special troops like heavy weapons or command.  Normally I use the Generic Command models for my armies in and case.  However, I did have some odds and ends lying around, so each squad has some robotic support elements available.  GZG has a plethora of robotic models available so filling out squads with missing weapons is not a problem if you are clever.  The robot medic is a platoon support element.  He was all alone in my WIP pile forever.  Now, he is happy.


In the end, I am pleased with this range.  They would make great generic bad guys or security troops.  They could also be used en-mass as an army in larger miniature games like ASL, assuming you fill out the missing elements with other models.


Tuesday, 4 August 2020

15mm Sci Fi - GZG Outrim Coalition

My painting marathon continues....over Sunday and Monday I banged off 80+ Outrim Coaltion figures from GZG.  I have been meaning to paint these guys for awhile now but I could not think of a color scheme that inspired me.  So, earlier this year I picked up a pack of 8 riflemen painted them in four separate color schemes: Tamiya Light Blue, JN Grey, Light Royal Grey and Vallejo Pale Blue Grey.  They were all very sci-fi in appearance.  So, I presented them to my standard painting critic: my Wife.  She picked Light Blue.  Problem solved.  JN Grey was my second choice (they all looked good actually) and will probably be used on GZG NI Infantry force.

GZG Outrim Coalition


GZG Outrim Coalition - left to right: Light Blue, Royal Light Grey, Pale Blue Grey, JN Grey

The models required almost no cleanup.  All I did was give the helmet tops a light sand to remove a minor mold line.

The color palette was as follows:
  1. Hot glue all infantry to Popsicle sticks.  This is basically step zero, prior to airbrushing.
  2. Primed White
  3. Tamiya Light Blue basecoat
  4. Weapons - Reaper Afterburner Grey
  5. Visor - coated with Vallejo Chrome then washed with Tamiya Clear Red.
  6. Special weapons were given yellow markings in Tamiya Yellow Green then in Reaper Lantern Yellow.
  7. Entire model washed in Army Painter Military Shader.
  8. Visor washed in Army Painter Strong tone (to bring it down a bit in shine)
  9. Armor highlighted post wash in 3 steps:

    • Vallejo Pale Blue
    • Vallejo Pale Blue Grey
    • Reaper Ghost White for extreme highlights in certain areas.

  I did not bother to paint the belt pouches a separate color, considering the kit would be painted the same as the armor (ala Stormtrooper belts).


GZG Outrim Coalition Special Weapons

GZG Outrim Coalition Heavy Weapon Teams
Power armor teams were done in an identical pattern  Shoulder plates were painted in Ghost White post wash.
GZG Outrim Coalition Power Armor


Overall I cannot complain on how these models turned out.  The light blue fits a space marine force and pops from a distance.  The models are typical of GZG's high quality, particularly the power armor troops.  They are large and quite imposing.  Perfect for a mysterious force from beyond human space.

Friday, 31 July 2020

15mm Sci Fi - Brigade Models Polish Mechanized Infantry

Over Thursday and Friday this week I finally got around to painting a range that has been on my to-do list for years: Brigade Models Polish Mechanized Infantry.

This range was originally released by Armies Army, as Neo-Soviet Infantry I do believe.  In any case the range was picked up by Brigade and re-released as a Polish line.  These guys reminded me of both the 40K Steel Legion and the Pig Iron 28mm Kolony Militia range.  Other projects were always in the way and I never had a good reason to paint these guys, until today (57 of them in fact).


The models are large, similar to GZG in size.  There was virtually no cleanup at all and mold lines were non-existent except on a couple of models here and there.  The scheme I chose was simple: a Soviet style tan color, suitable for Sci Fi or Post Apocalyptic.

The color palette was as follows:

  • Tamiya Flat white base.
  • Tamiya Buff base coat.
  • Gas Masks - Reaper Rainy Grey  followed by a coat of GW Basilicanum Grey Contrast Paint
  • Reaper Tanned Flesh Highlight on the hands
  • Reaper Afterburner Grey on all weapons and binocs.
  • Reaper Khaki Highlight on belts and pouches
  • Vallejo Carmine Red on the helmet laser sight
  • GW Black Templar Contrast paint on all boots.
  • Vallejo Pale Green for RPG warheads.
  • GW Creed Camo Contrast Paint on the sniper's helmet.


The models were then washed in Minwax Polyshades Tudor.  I tried Army Painter Strong Tone dip on one model but I found it was too light for my taste.  I always brush on Minwax, starting from the top down.  One dip of the brush is enough to coat the whole model.


If possible I set models outside to dry, which only takes maybe an hour or two on a hot day.  After this they receive a coat of Vallejo Matte Mecha Varnish and then the detailed highlighting begins.  I used Vallejo Model Air Sand Yellow followed by Vallejo Sand Ivory for various parts of the uniforms, just to make certain armor plates and helmet edges stand out.  The pouches were re-highlighted with Reaper Khaki Highlight.  Vallejo Desert Tan is another color which could be used to fix mistakes or to highlight areas like the helmet if you wanted a less stark contrast.

Post Paint Rework Issues: If any uniform areas need touchup then Vallejo Desert Tan is a perfect match, post Min-Wax.  I did discover some mold lines on certain helmets, post-paint.  This was due to the soft white light I was working under which caused me to miss certain defective areas.  I used my Dremel to grind them off and then repainted the areas in Tamiya Buff, followed by a small pin wash of Army Painter Strong Tone.  Desert Tan was then used to blend and make the rework areas look seamless.  Maybe I am getting old, but more and more I am finding that I miss things like this until it is too late and fixing the issue becomes a major pain.  I could inspect each model with my magnifier light I guess.  That sounds equally painful.


All of my bases are done the same: Tamiya Flat Earth, followed by a drybrush of Reaper Dirty Bone followed by Woodland Scenics Earth, Grass and Weeds flock.

Overall I am very pleased with this range.  They would fit well into any near future game such as Zone Alpha, Rogue Stars, Tomorrow's War or Gruntz.

Thursday, 30 July 2020

15mm Sci Fi - Khurasan Corsair Battlesuits

My wife and I have been camping at Lake St. Peter Provincial Park for this past week so my painting has of course taken a hiatus.  However, I managed to get these done yesterday when I had some free time after we got home

15mm Khurasan Corsair Battlesuits: they remind me of the soldiers from the original book Starship Troopers.  They are highly posable figures which required minimal cleanup.  There are a range of backpacks for each figure to choose from.  My original intention was to have the targeting pack on all four, but I was an idiot and totally missed the fact that I used the wrong ones on two of them until it was too late. 


The paint scheme is not the most inspiring: Tamiya JN Grey, Reaper Afterburner Grey accents, Tamiya Clear Red and Metallic Blue accents, washed with Minwax Tudor Polyshades.  I could have highlighted them with Vallejo US Light Grey which would have been a perfect match, but due to general laziness I decided to forgo that.   I will likely add some decals at some point.


Wednesday, 22 July 2020

15mm Sci Fi - GZG Japanese Power Armor Urban Camo

Camo schemes are not something I normally do on 15mm models.  The effect is normally lost due to the small nature of the figures and the distance on the tabletop.  However, I had these guys kicking around and decided to have a go at an urban camo scheme.

15mm GZG Japanese Power Armor

 It was a simple scheme to execute and looks pretty good when it is not right next to the Mark I Eyeball.

Japanese Power Armor Urban Camo


  1. Basecoat Tamiya JN Grey
  2. Hand brushed Vallejo US Blue Grey, Valleo Dark Panzer Grey.  
  3. Gloss sealed.  
  4. Army painter Dark Wash.  
  5. Highlight with US Blue Grey and Vallejo US Grey Light 71.045 
  6. White dots added at select locations to simulate light reflections which occur naturally.  It also draws the eye in and moves it around the model 

15mm GZG Japanese Power Armor

The trick with camo is to simply give the impression of a scheme.  At this scale it does not need to be accurate: large patches are better than trying to do something realistic (such as small camo patches).


The gloss coat was important before washing.  Otherwise the wash would have stained the blue and grey and required additional re-highlighting to correct the color.


I will likely do something similar with some GZG Grav Armor that I have laying around.

Tuesday, 21 July 2020

15mm Sci Fi - Khurasan Miniatures Flying Saucers

Over the years I have painted and sold thousands of models.  Typically I do ok on such sales, making a tidy profit which funds my hobby.  However, last year I made the mistake of selling a large part of my 15mm sci fi collection (something I never thought I would do), selling some six armies(Kra'Vak, Xar, Alien Greys, Xenomorphs, UNSC and Tomorrows War US Marines). I did not regret it at the time since I had not played in years.  Eventually though, I picked up a brush (to do something totally unrelated) and was bitten by the paint bug.  So, starting in May of this year I began a painting marathon.

Funny enough, sometimes in life you have to take a step back before moving forward.  I was happy with what I had painted in the past but I can certainly do better now.  Fortunately this blog recorded the steps taken to create my armies so I was able to retrace my steps and better yet improve upon them.  The Kra'Vak, Xar, Greys, USNC and US Marines are back, and better than ever.   800+ models painted since May with more coming.  With organization and planning I am able to easily paint dozens of models a day to my fussy standard that is probably overkill on 15mm figures.

A couple of things I learned over the years (and recently) which helped me become more efficient.

1) Keep a painting log.  I have always done this but it is important if you want to retrace your steps or add forces at a future point and want uniformity.

2) Get some practice models.  I use old GZG ESU Naval Infantry to try out airbrush color schemes.  This helped me avoid needless stripping of the models I actually wanted to paint.

3) Standardization.  Keep basing methods standard as well as base size.  In the past I had switched up my schemes which caused non-uniformity.  Now I use the same method for everything.  It is likely that I am single handedly keeping at least one metal washer company in business.

4) At 15mm washes are your friend.  Learn the difference between products and how they work.  GW, Army Painter and Vallejo washes are not the same and work differently from each other.

5) Use bright colors, even for modern day military figures (I use a white undercoat for almost everything at 15mm).  Complex blending and shading is for 28mm.  At 15mm you need high/sharp contrast to see anything at a distance.  If you think you have overdone it than it is probably just right for 15mm.  

6) Tamiya paints are superb for airbrushing, especially for basecoats in lieu of a traditional primer.  The lighter colors like JN Grey, Light Blue, Grey Green and Medium Grey are great for sci fi figures.  NATO Black and German Grey are great for vehicle basecoats.

7) Think real hard before you sell your stuff.  


This weekend I managed to bang off 100+ models: 65 Asgard Marines, 24 Khurasan Xenomorphs, 11 Khurasan Xenomorph Bio Force Shock Troopers and two Khurasan Flying Saucers.   The models required some minor clean-up, typical of Khurasan resin models.  

There were super simple to paint: Tamiya NATO Black undercoat, followed by Vallejo Black Metal, Vallejo Gun Metal, Vallejo Steel and Vallejo Chrome, all sprayed at 45 degree angles to achieve a color modulation effect.  Windows were left metallic, washed with Tamiya Clear Red and then washed with Army Painter Dark Tone.   Vallejo metallic paints are a joy to airbrush - they are the smoothest metallics that I have ever worked with.  

15mm Khurasan Flying Saucer

These babies complete my Alien Grey Army which is now totally rebuilt.  Yay!

Friday, 17 July 2020

15mm Sci Fi - Alternative Armies Asgard Space Marines 2.0

Several years ago I painted several dozen Asgard Space Marines by Alternative Armies.  At the time I wanted to do a proper scheme but I didn't have the skill necessary to accomplish what I wanted (basically to replicate Sam's own scheme which is used on AA's web site for the 28mm versions).  Subsequently I painted them in a shameful metallic scheme which I can proudly say is now no-more (stripped).

To my great pleasure I have recently discovered the beauty of Army Painter Washes.  I have used Dark and Strong tone for years but only recently did I pony up and purchase their whole line of washes in a single kit.  To my surprise they are quite different than the GW products.  They flow better, do not stain the underlying paint immediately and can be worked with a lot longer on the model than GW products.

So, last week, while playing with them on some practice GZG models I had lying around I discovered that one wash in particular, Military Shade, works WONDERS on a plain flat white basecoat.  The wash goes on black green but that is a deception.  It shades the recesses and leaves the white more or less intact (a tad darker, but not much).  I found it shaded the infantry model perfectly (assuming I wanted a stormtrooper).  I immediately tried it on a Laserburn Imperial Trooper and was stunned.  It produced, basically, a Space Marine from the White Scars Chapter, with no fuss, extra drybrushing or staining of the underlying white (needless to say I will be redoing my Laserburn Imperials in this scheme).  Anyway, I decided to have another crack at my Asgard models with this new recipe.

15mm Alternative Armies Asgard Space Marines

The models were basecoated in Tamiya Flat White.  Details like weapons and hoses (there are a lot!) were picked out with metallic paints and greys.  They were then washed in Army Painter Military Shade.  Once dry they were washed again in Army Painter Light Tone.  This was the key.  It gave the models a needed accent color and took the edge off the white.  Once dry I highlighted areas in Vallejo Grey White.


The flames were done in Orange, then washed with GW Orange and Yellow.  I could have just used the yellow and orange washes over a white basecoat and the flames would have looked much better I think.  That is the beauty of painting with washes.  Various other areas were washed in blues and greens to give some additional color and eye candy to the models.

My models had a casting defect which I overlooked initially: a hole in the backpacks which I forgot to fill.  Subsequent models will not slip by me like that.  Gavin at Alternative Armies was kind enough to drop in a surprise on my next order.  Also, I always seem to miss filing off a mold line or two.  They are particularly hard to see on these guys for some reason.

15mm Asgard Space Marines
One guys foot is messed up, due to casting.  I could have fixed it, but its so damn hard to see beforehand.  I did fix the one boot afterwards (where the wash pooled).


Still playing around with the smoke.  Flocked one and decided to strip it off.

Prototype Laserburn Imperial Trooper in my new white scheme.  Identical to the Asgard Marines basically.  The only change will be that the pouches will be left white and washed GW Green.  All white models need splashes of color to keep the eye moving around.


Overall I am pleased on how they came out (the real thing is always better than pictures I find and at a distance, meaning anything other than right in front of your face or a super-zoomed photo,  they look good).  They were not too difficult to paint, now that I have mastered this scheme.   Surprising there is a lot of little fiddly things on them which just beg for detailing.  More so than you would think.  Hopefully I have the fortitude to finish up the remaining troops I have left.  They are intended to be used in Alien Squad Leader as an Imperial Strike Force and Rogue Stars as character models (hopefully).


Thursday, 16 July 2020

Warahmmer Fantasy Battles - Chaos Warriors Legions of Slaanesh


Part 3 of my Warhammer Fantasy series: The Legions of Slaanesh.  I created these guys in response to my Khorne legion.  Using the old 3rd edition Slaves to Darkness book both armies incorporated interesting units from 3rd edition, including Demons.  They were designed to fight each other in the Chaos Wastes using the rules from that old tome.  Battles were epic in power and scope.   


If Khorne is my hammer, then Slaanesh is my scalpel.  When I want to kill in style I call upon the Dark Prince.  This army is a garish mishmash of color.  Pinks, blues & blacks.  While this army does not have the brute strength of Khorne they laughed at fear causing foes, gladly fighting to the death while simultaneously enjoying the how the spray of their own blood formed pleasing patterns on the battlefield. 


Look upon my greatness and despair.


Visitor Total