Showing posts with label Tips. Show all posts

Sunday, 11 August 2024

My Gaming Den 3.0

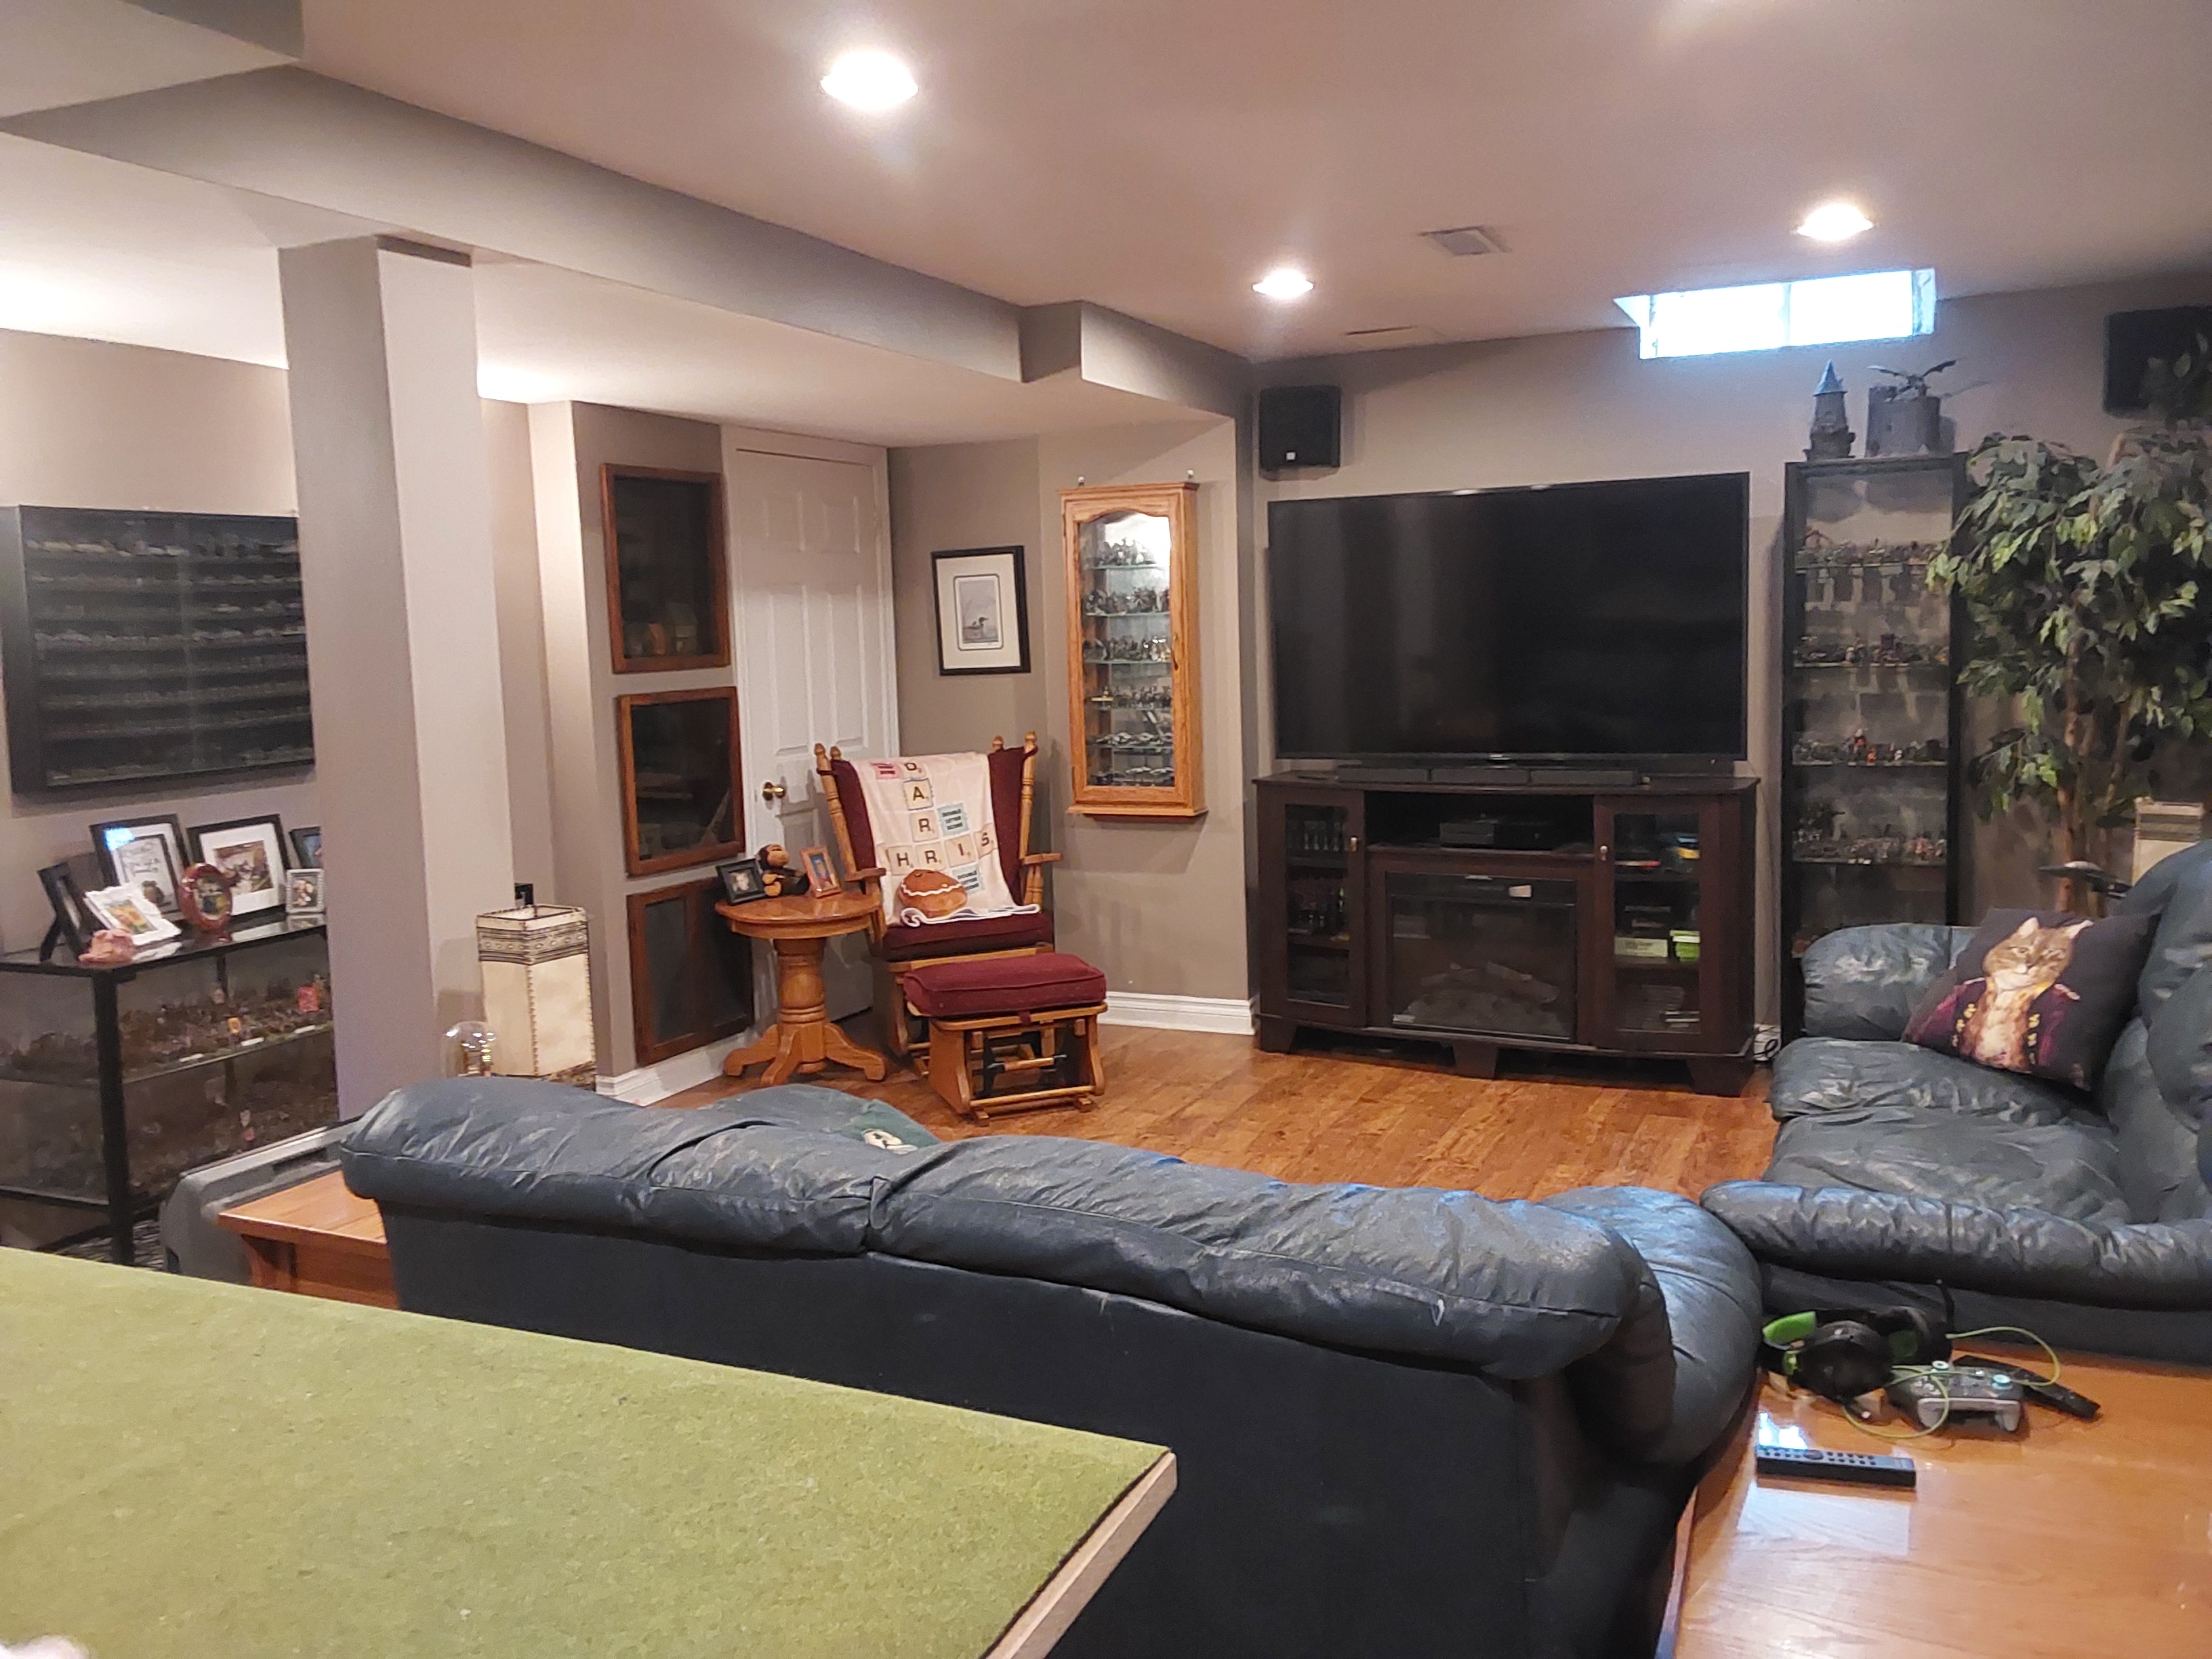
I admit: I am spoiled.  My wife is very accommodating and has allowed me to claim the basement as my own domain.  She is supportive and came up with many of the ideas below. 

Over the years my basement Den has slowly evolved: from an unfinished concrete basement into a cosy warm cave. Lage TV, fireplace, 3 piece washroom, leather sofas, gaming area and plenty of display and storage options.  


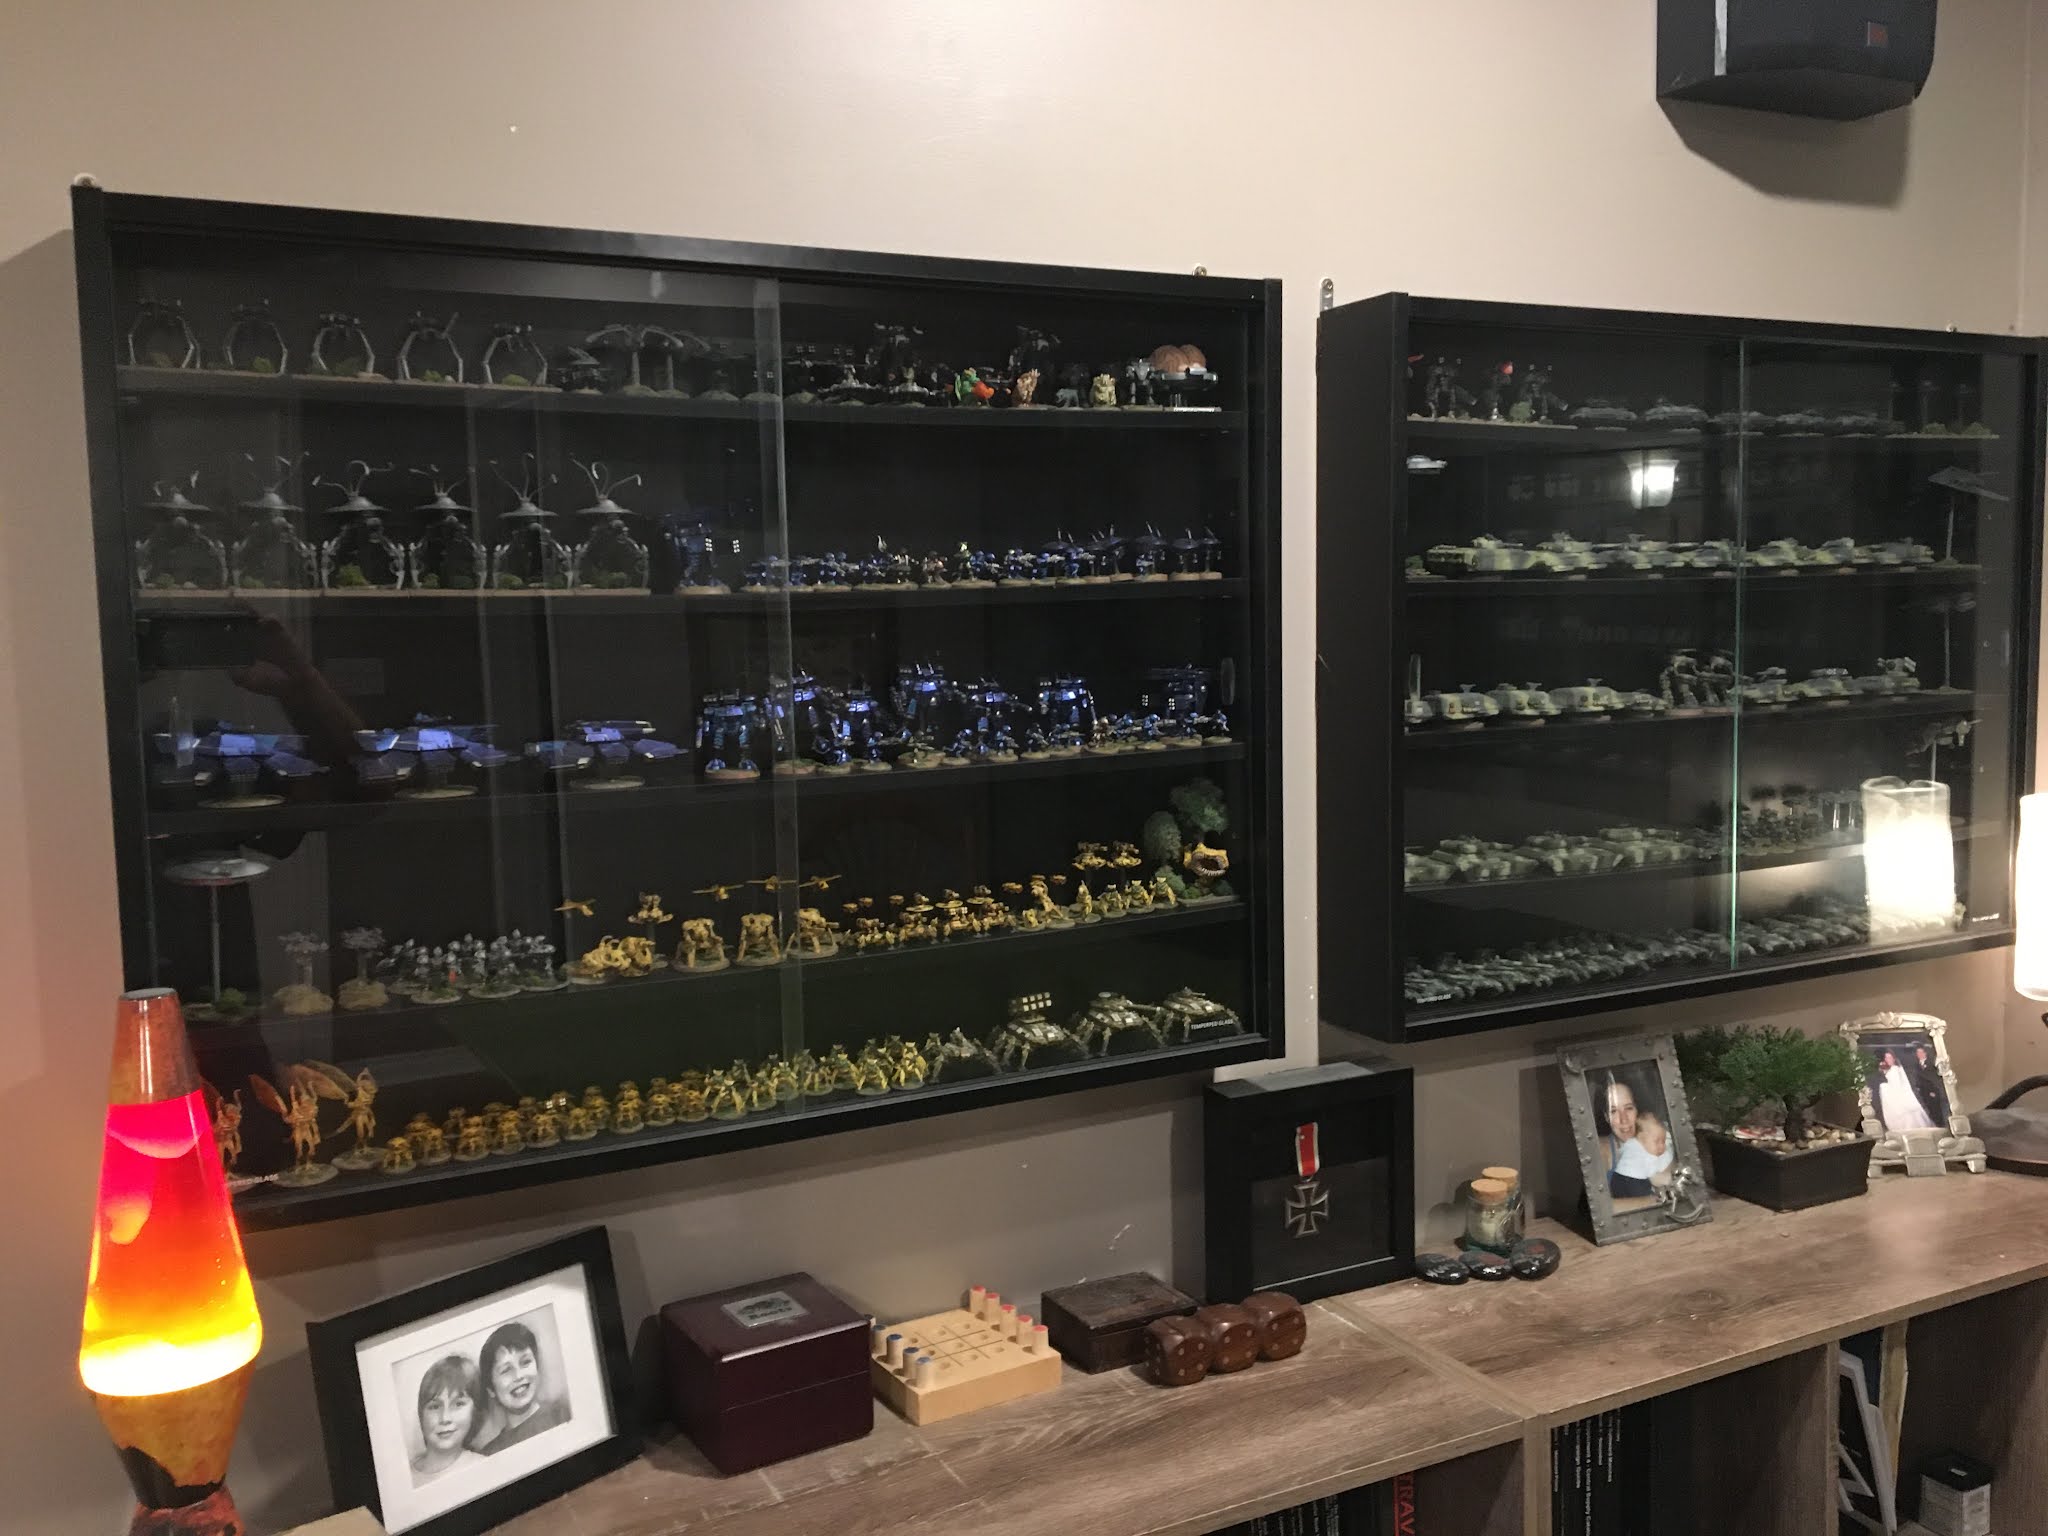
For miniature display my den contains 4 large glass display cabinets, 10 wall mounted glass cabinets and 3 wall mounted antique letter press drawers converted into display cabinets. 
Asher is my main gaming opponent.  He usually wins. 

My gaming table is a 6.5 x 4 foot MDF board, with multiple gaming mats.  It is mounted on black resin shelving which holds all my board games, painting supplies and some terrain.  The table is bar height, 40 inches.  Smaller terrain is stored at the side, in a roll around storage bin.  


The side wall has inserts in the wall which hold terrain and buildings.  The two small display cabinets hold my first 28mm figures I ever painted.  Many are horrible or sub par.  I keep them on display to remind myself how much I have improved over the years. 


The TV is my middle son's primary video game area. The larger glass cabinets hold my old Warhammer armies, 8 in total: Chaos Warriors (Khorne, Slaanesh and Nurgle), Dark Elves, Orcs and Goblins, Beasts of Chaos, Ogres and Vampire Counts.  


Two book cases hold all my printed material: RPGs and gaming books. 

V

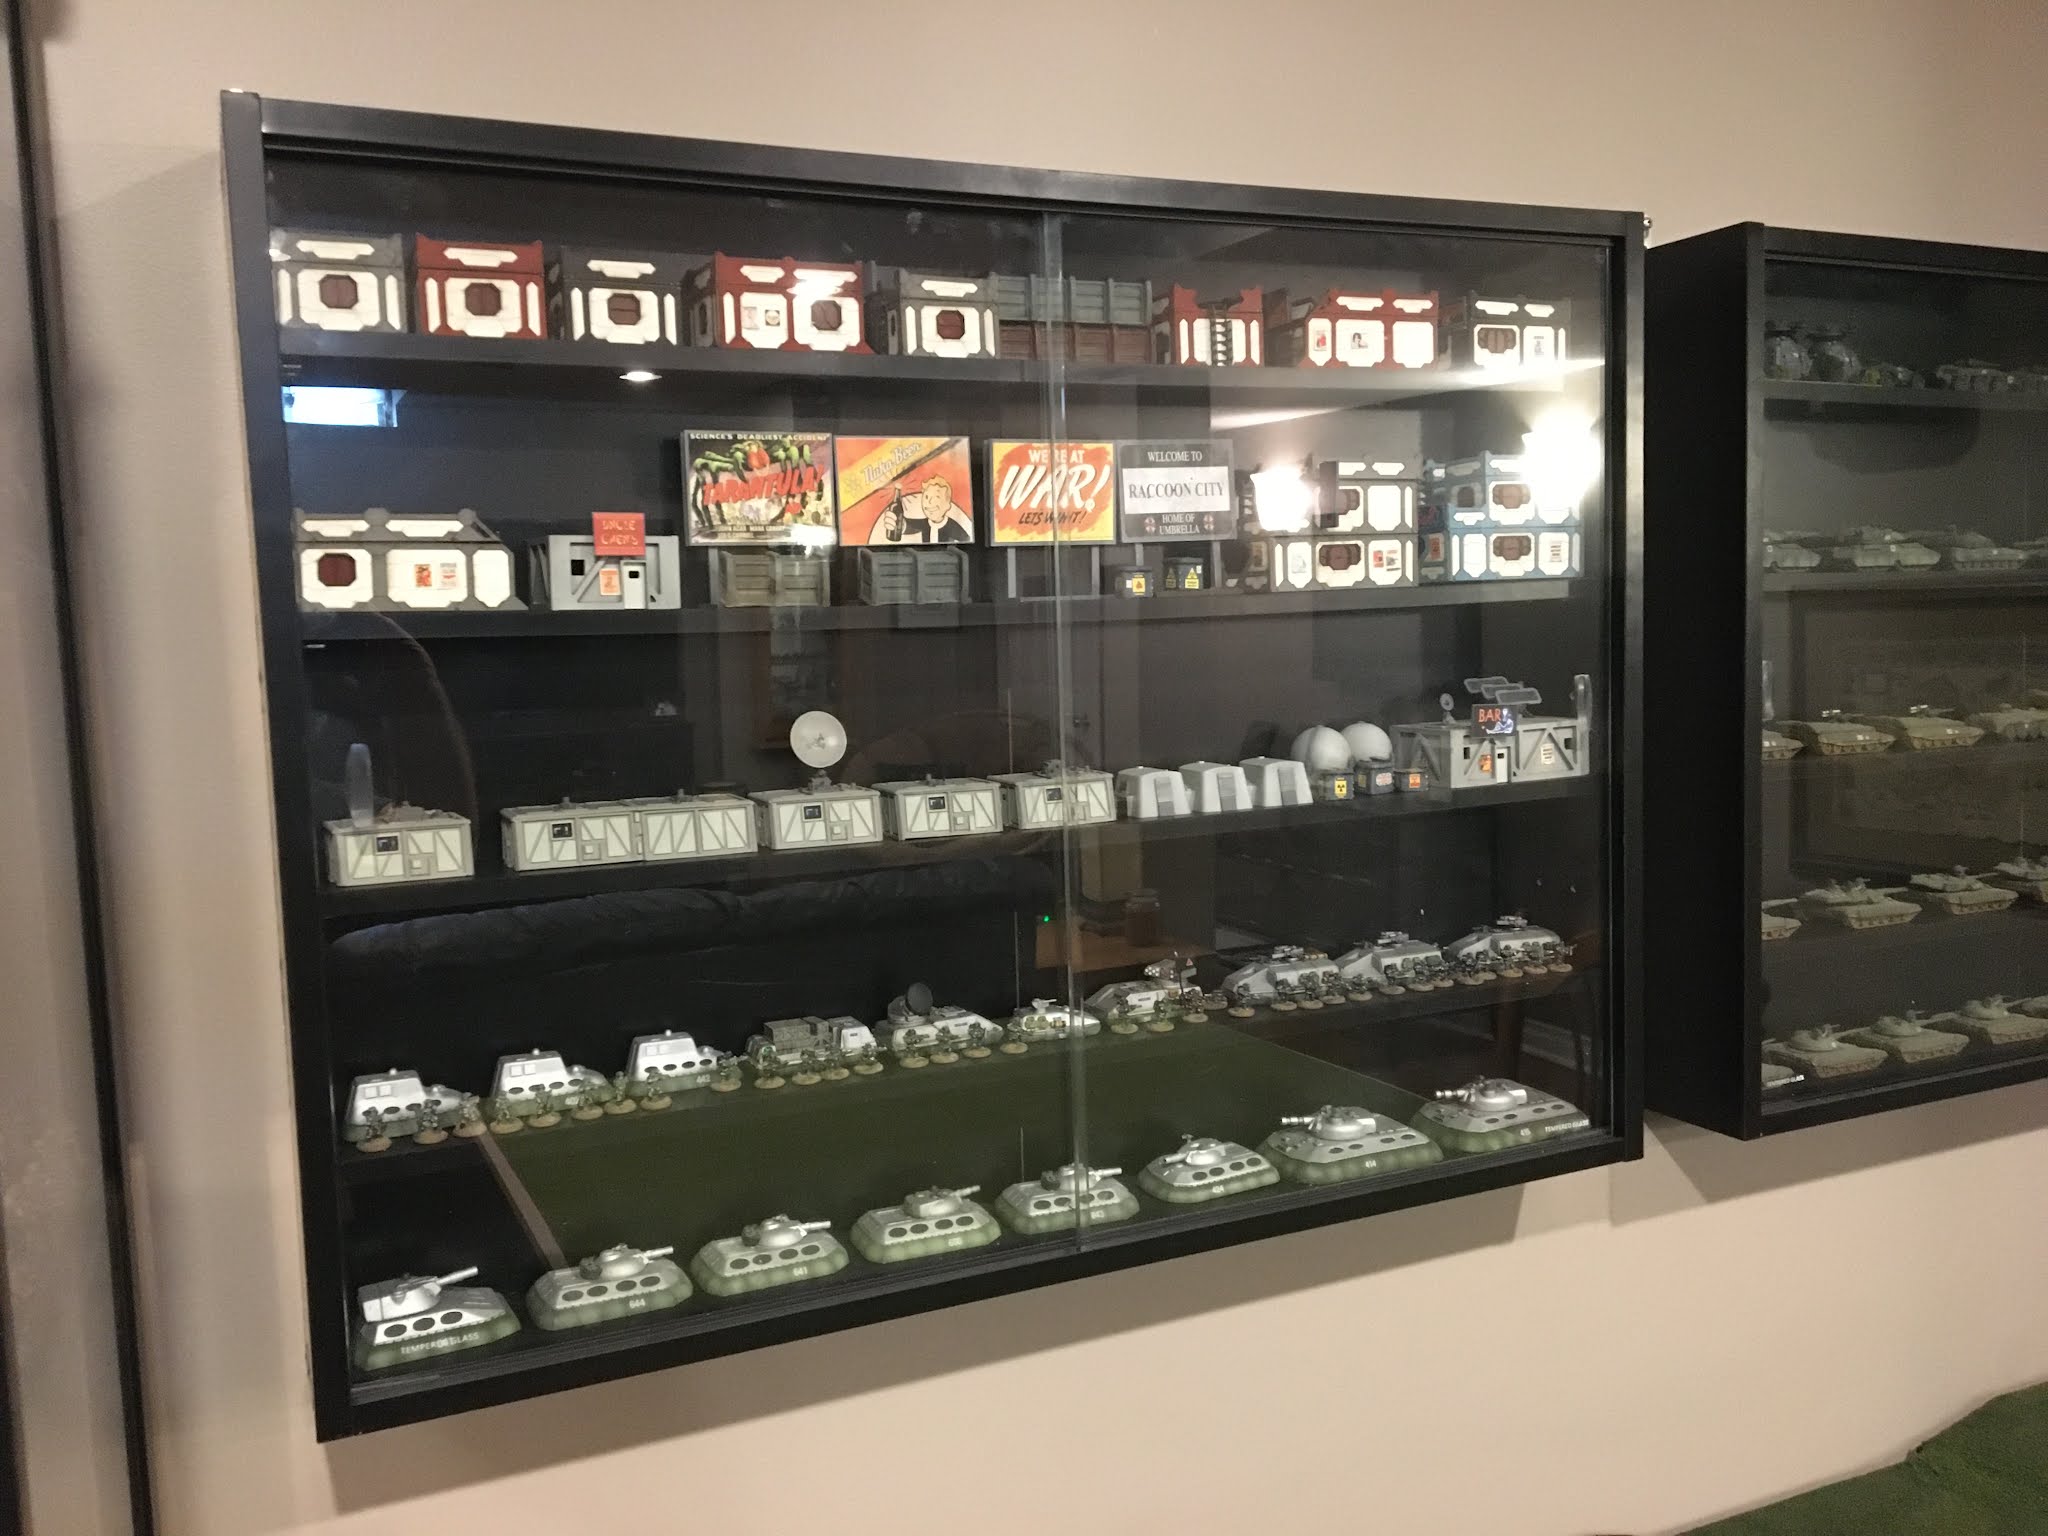
Most of the wall mounted cabinets hold my 15mm collection.  

Just outside of the main room is a small alcove under the stairs.  It holds my hobby carts and larger terrain pieces in pull out plastic storage bins.  


This is my space, the place where I come to forget about adulting and be an irresponsible kid again.  

Friday, 2 September 2022

15mm Figure Display/Storage Solution: Letterpress Drawers

Good day.  Yes I am still alive.  Nothing really to report on the painting end of things.  Maybe later this year.

I did come up with another storage/display solution for my 15mm Sci Fi figures, this time from an Antique Shop: old Letterpress drawers, used by printer companies of ages past.   They come with various internal designs, but all are basically 32" x 17".

Purchasing two, I hung them on my wall and presto, instant display cases.  


Each slot holds either one or two figures.  I could get three but I prefer not to have them crowded.  Eahc drawer holds 210 figures.  


For $55 each it was a good deal.  

Friday, 13 August 2021

The Gaming Den 2.0

Two posts in one day.  I must be motivated.  

This week I was able to "Level Up" my downstairs Den.  Specifically, I created a dedicated 6'x4' table to replace my two 4'x4's (an eight foot length table was just too big for the space and necessitated me moving furniture around to unpleasant results).  With the addition of some gaming mats from Front Line Games everything will be complete.   

The table is just 3/4" MDF (no chance of warping at this thickness) with 4 sets of folding legs.  I had to cut the MDF to fit downstairs and connected the two pieces with twin piano hinges.  


In addition, I added the last of my 5 wall mounted display cabinets, care of Amazon.  They each contain five shelves.  However, I can add three more to each case by adding some of my own, care of Home Depot.  This will allow to me expand my miniature display ability and get most of my 15mm infantry figures out of their foam case tombs and into the light of day.  

That oak wall mounted unit will be holding my collection of large 28mm fantasy monsters very soon.  Yay!

The room also doubles as the Home Theater.  


These wall mounted cases are great for 15mm vehicles and buildings.  You could display anything with up to a 2.5" base in depth.  

Yes, I have been decorated for heroism on multiple miniature battlefields.

Many of my buildings went from a storage bin to display.  Yay.


This was a big week.  Things have finally come together.  Now I can die I guess.  :-/  


Sunday, 8 August 2021

Why I choose to use Minwax vs traditional washes.

Over the years I have experimented with many different miniature scales, genres and painting techniques. During this period my style of painting seems to be in perpetual change:  I do not hold to a single painting method or style.  This has resulted in my use of different products for different miniature types, which can change depending on my mood at the time of the project.  In the case of 15mm Sci fi miniatures, I have found that when completing Army Scale projects I tend to use Polyshades Minwax vs traditional acrylic washes to complete both figures and vehicles.

Polyshades come in a variety of earth tones and is both a wood stain and Polyurethane varnish.  Army Painter Dips are basically the same thing as Minwax, with the price being the main difference.  I have tried all of them and found no difference at all in quality (although I find the Army Painter products thicker than Minwax).

The closest color matches are:

  • Army Painter Dark Tone - Tudor (this is my go-to)
  • Army Painter Strong Stone - Antique Walnut
  • Army Painter Soft Tone - Pecan

Why would I use such a product?  It has a few major disadvantages vs acrylic washes:

  • Oil-based, requiring mineral spirits to clean up and thin.
  • Long drying time.
Lets go through these one at a time:

Oil Based

Yes, this is a pain in the ass.  However, a quick trip to the Dollar Store will solve a lot of headaches.  I use small plastic painting pots with plastic lids, 8 to a pack and a small dropper bottle that I filled with mineral spirits.  The small pot allows to me to use just the mount of stain that I need, which can be thinned in the pot by the dropper bottle.  No fuss or mess.  I keep some paper towels handy and usually work on top of an old Pizza box.  This keeps the mess contained.  Oil based stains are also much more forgiving than acrylic washes.  If it gets in an area that you would prefer to avoid it is a simple thing to wick it away with a brush.  

Drying Time

Oil Based stain can take up to 24 hours to dry.  This causes painting projects to be placed on hold while the product cures.  There are 3 ways of speeding this up:

  • If the day is hot and dry, put your models out in the sun.  They will generally be dry within 3-5 hours.
  • Another option is to use KLENK'S JAPAN DRYER.  This is a product that you can generally get at a local hardware store.  It is a hardener and speeds up the drying of oil based products.  I generally add a few drops to my paint pot mix.  This product is also very useful if the weather is damp or cool.  Sadly I do not know how much time this speeds up the process since I generally use the last method. 

  • The final method is to bake your miniatures.  This only works with metal miniatures.  Do not try it with plastic or resin models (thick resin like Old Crow models seem to work fine though).  You have been warned.  Set your oven to 170 degrees and leave the door slightly open.  Place the models on a baking sheet and go relax.  Within 40 minutes they will be dry and the stain cured.  

Now, I do not use Minwax on all of my projects; for single figures and models with bright colors I use traditional washes and other techniques (such as working in triads, with a shade, base and highlight 56color).  The color palette and the desired effect dictate my approach.   

Tudor is close to Dark Tone, but it is really it's own color.  I find it a good mid point and looks more natural than a brown or black (brown can look like spilled coffee and black is often too stark looking IMO).  Tudor works best with earth tones, and perhaps a dark red.  While it is possible to use it right out of the can, I always thin mine before use (no more than 3:1).  1:100 scale figures are already very finely detailed and it does not take much to actually bring out the contrast and shading.  Too much can cause pooling problems and obscure details on the figure.  It is best to examine larger models after application and remove any pools which occur.  Quite often I will add a highlight in the post wash stage of the figure, to bring out details which I want to pop out.  

When painting vehicles and large models I generally apply a Gloss Coat before using the stain.  This is not necessary, but I find the end result is better.  This is especially important when working with large flat surfaces.  The gloss surface tends to prevent pooling, allowing the wash/stain to flow into the model's recesses naturally via capillary action.  If a model contains too many large horizontal flat areas I often avoid this whole process and use a traditional acrylic pin wash instead.  Model geometry plays a large part in what I do and how.

Now, why use this product vs acrylic washes?  Minwax does not stain the base color of the undercoat as much as an acrylic wash does and is forgiving to work with, especially if you gloss coat the models first.  Its shading effect is more subtle looking (at least to me) vs acrylics, which may be what you are looking for.  Again, it depends on your base colors and what you desire.  This is not a method for high end painting, but will give good tabletop quality results quickly.  

In the end it is a matter of choice.  On 1:100 scale figures both products work well, if properly thinned and applied in a measured fashion.  


Monday, 31 May 2021

2021 Model Count so Far and random musings


Well, so far 2021 has been a busy year for me...not as busy as 2020, but still busy.  Last year I focused almost strictly on 15mm Sci Fi miniatures, painting over 2000 of all types (infantry, vehicles, ect), all between April and December.  I painted almost every day, knocking off one project after another.  By Christmas I was totally burnt out.  Anyone who lives with me knows I have a bit of a compulsive personality: its all or nothing.  

I still have a mountain of 15mm left to paint, mainly from GZG and Khurasan.  However, over the holidays I took a break from Sci Fi and started a project that I never thought I would tackle: my War of the Roses troops, from Perry Miniatures.  

Purchased back in 2016, it took roughly 2.5 months to get through the 4 boxes of plastic troops.  I hate assembling plastic models, and I almost stopped the project due to my hatred of them.  But in the end I managed to complete the project: 82 troops and 24 cavalry.  Not a huge amount of troops by any means, but it was quite a change from 15mm for me (I have not painted 28mm in years).  

In spite of my plastic kit-hate, completing this small project spurred me on to complete some of the 28mm figures I had sitting around the WIP bin...and then some.  So far this year I have painted:

  • (200) 28mm scale infantry
  • (43) 28mm Cavalry and or Large Monsters
  • (60+) miniatures repaired and others completed which were in a half done state..too many to count.


This required a lot of time of and not a little bit of planning.  I am not the best at coming up with my own paint schemes, preferring to replicate the patterns of others.  I have no shame and will steal a pattern if it suits my needs.

However, even with a pattern in hand I still need help completing projects in a timely fashion.  For this, I have a secret weapon: my Iwata CS Eclipse airbrush.  The CS comes in a kit, with inks and more importantly a Compressor.  That is a very good bargain and an excellent way to jump right in with everything you need.

Iwata CS Eclipse Airbrush

The airbrush is a device I have used for almost 10 years now.  It is the single most important painting tool I own (apart from my hands).  With it I can prime, apply base coats, highlights on larger monsters/vehicles and varnish completed figures.  The priming and varnishing alone is a huge benefit since I can avoid using expensive and hazardous spray cans.  This is a massive cost savings and has paid for the airbrush many times over.  

The Eclipse is a good starter and mid-range brush.  It is designed for either 0.5 or 0.35mm nozzles, allowing either broad or detail work.  For extra fine work, I recommend the Iwata HP-B Plus model, which has a 0.25mm nozzle.  

Iwata HP-B Plus Airbrush for extra fine work

The application of basecoats is the primary cause of my high (for me) painting output.  Personally, I despise the early part of the whole miniature process: block painting.  After painting thousands of models over the decades, my patience is long gone.   My goal is to get things done as quickly and efficiently as possible.  So, when painting a figure I determine what the primary color will be and then apply it via my airbrush over the entire model.  This does not happen in every case but it is my preferred method.  Keep in mind that I am not aiming for showcase or award winning figures.  My goal is what I call "Tabletop Plus".  I define this as a good gaming piece that has some extra punch to it (highlights, minor conversions, minor hand drawn symbols, ect).  

As an example, I recently painted 48 Citadel Dark Elf Warriors, in both spearmen and crossbowmen configurations.  Each lot of 16 took about a day and a half to complete (barring assembly).  

The process was:

  • Prime the models in Vallejo Black Primer.
  • Basecoat the in Vallejo Model Air Steel (much of the model is chain and plate armor).
  • Pick out the remaining details, painting over the steel basecoat: Vallejo Black with German Grey Highights; Vallejo Red Violet with Vallejo Game Color Warlord Purple highlights; Vallejo Game Color Magic Blue and finally Reaper Tanned Skin Shadow
  • Apply washes where applicable: Nuln Oil and Army Painter Soft Tone, both with a drop of Future Floor Wax to break the surface tension.

These were painted in a few hours with the process above.

Brush painting metallics is problematic at best.  They are typically very thick and require thinning.  They are also prone to chipping and their unique nature (the aluminum component) makes chip repair very difficult.  Blending and creating a smooth transition on a chipped surface is something I have yet to master.

For maximum quality Metallics are best applied via an airbrush.  The coverage of Vallejo Model Air metallics in particular is super smooth and speeds up the whole project (assuming the base is a metallic), saving me hours of painting time.  Normally, metallics are best applied directly over a Black Gloss Primer.  The gloss creates a bright finish and the smooth surface allows the paint to work it's magic.  However, in this case, since the models are so small, the the details were so fine that I choose a regular black primer instead.  If you are painting vehicles though (of any scale), go with the gloss.

Vallejo Model Air Steel, I use this almost exclusively for metallics, best applied over a Black Gloss Primer

Another nice thing about Vallejo Primers is that they shrink and fill in the gaps and create a smooth surface for painting.  They are also a proper Primer (with glue in them) vs something like the old GW Chaos Black (which is not).  I also use the Vallejo Black Primer as my regular black paint.

So, the point of all this is: if you don't have an airbrush, consider obtaining one.  It takes time to learn how to best use it, and you will spend a lot of time cleaning it and unclogging the nozzle (while cursing) when you don't thin your paints enough.  But in the end, if you stick with it you may find it becomes your most valuable tool and wonder how you ever lived without one.  

Tip: Avoid expensive airbrush cleaners.  Windex works great (any cleaner with ammonia will due...ammonia dissolves paint) for airbrush cleaning.  Just fire it through the brush and the paint will dissolve on its own.  Soaking the airbrush in a jar of Windex will also help unclog dried paint.  For long term airbrush heath I recommend investing in an Ultrasonic Cleaner.  They can be found on Amazon for a reasonable price.  

Any cleaner with Ammonia will effectively clean an airbrush.

The other secret of my success: Organization.  Most of my paint collection is stored in Vallejo Paint Racks.  They are organized by color, and with six of them everything is at my fingertips: primers, washes, paints, pigments...everything.  If you have the space, invest in a paint rack system.  Your output will improve dramatically.  


Anyway, fantasy and historical figures will likely take much of my painting time for 2021.  I have 60 28mm fantasy figures left to paint.  After that my next project is looming on the horizon: my Perry Miniatures Agincourt figures.  Almost 400 models in total.  It is unlikely I will return to Sci Fi until 2022...but who knows.


Sunday, 7 February 2021

15mm Sci Fi - Individual basing vs Group basing


I have a large painted miniature collection, both in 28 and 15mm.  The problem is I can never decide on a rules system to rule them all.  This impacts my model basing strategy since some games are structured around a specific basing system.  Over the years I have come up with a number of ways to make my collection, for both miniature scales, as flexible as possible.

Before I go into details, lets go over some of the rule systems that I use and or plan to use.  

Fantasy

  • Warhammer/Oathmark - Individual based models.  Movement trays.  
  • Kings of War - Group basing.  
  • Hordes of the Things - Group basing.  Base size dependent on model scale.  

Sci-Fi

  • Gruntz - Originally designed for individually based models.  Version 2.0 is moving towards group basing but can be utilized either way.  
  • Alien Squad Leader - Group basing.  Units take 2-3 hits before elimination.
  • Tomorrows War - Works best for individually based models.  Group basing can be used with difficulty.  
  • USEME / Fireteam Andromeda / Laserburn / Beamstrike / No Stars in Sight / Clash on the Fringe - Individually based models.  

Originally, I  began my miniature painting career with Dungeons and Dragons in the 1980s.  RPGs are by their very nature individualistic, so group basing was totally unknown to me at the time.  This carried over once I began painting 15mm figures. 

As time went by I was exposed to move and more game systems.  Many of these used the group basing concept.  It seemed strange and unappealing to me; why would someone hamstring themselves by basing their miniatures in large groups?   Eventually though, I began to read some of these systems and found them appealing, particularly Alien Squad Leader for sci fi and Hordes of the Things for fantasy.  The problem was my entire collection was individually based.  What to do?

The answer was quite simple: create the bases needed for each game system and find a way to temporarily secure models to them.  This would preserve my desire for flexibility while at the same time allow play with group based games.  

For a game like Alien Squad Leader the process was rather quick: take an MDF base and flock it in the same style as my miniatures.  Blue or White Poster Tac is then used to attach the various models to the base (temporarily).  Some of my models use large bases which prevent multiple models from being placed on bases this way.  This is not always  aesthetically pleasing though.  My solution to this was to create, where possible, small dioramas on specific MDF bases, trees, clump foliage, rocks, ect.  This provides the visual bulk needed when a single model is placed on a base which is slightly too big for it.  

Alien Squad Leader Regular Infantry, on 50mm square bases.

Hordes of the Things required a bit of a hybrid approach.  At 28mm all units have a 60mm frontage (depth being variable depending on the unit type).  This is a pain since my collection is based on 20mm, 25mm, 40mm and 50mm square bases.  In some cases, depending on the unit type, there is simply no good solution.  Behemoths for example are 60x60.  This means I can get 1 Ogre miniature on a base.  Not exactly visually appealing.  For other sizes though I use a combination of my ASL approach and custom bases.  

Hordes of the Things Custom Bases: Taking an MDF base of appropriate size, I then use plasticard strips to create a base with a recessed interior.  This is more visually appealing than just placing a 50mm base on top of a 60mm base.  In some cases the depth of the base (say for flying units, 60mm x 40mm) is the same as the base of the model I am going to use (40mm x 40mm).  In this case only the sides of the 60mm base have plasticard, since the depth of the base is the same as the model.  The figure then simply slides in between the two edges.  The model is secure since the width is slightly less than 40mm.  Just enough to get the model in but not slide out.  

Custom MDF bases, some with magnets

Models are  now ready for a Horde of The Things game.


None of these examples is particularly original or creative.  My idea was to be as simple and utilitarian as possible, allowing  my models to be used in a variety of ways without being tied to one particular game system.


Thursday, 19 November 2020

Homemade Washes - Reaper Master Series Walnut Brown

For many years in my painting career (pre-2008 or so) I did not use store-purchased washes, for the simple reason that they were not available.  Back then you had to make your own.  Well, sometime in the early 2000s I stumbled upon a particular wash mixture that worked well for me for years: Reaper Master Series Walnut Brown.

This color is part of the Master Series Triad system: Shade, Base Color and Highlight.  The Triad system has served me well for 20 years.  In any case, this particular color, Walnut Brown, was my go to wash for years.  Once GW launched their own wash line I gradually moved away from making my own.  Whether this was a good or bad decision is up for debate (at least to me).


The mixture is simple: 10:1, paint to Distilled Water.  Mix and use.  These kinds of washes are not like GW or Army Painter.  They are runny and take practice to use (like any true wash).  But it works like a charm and gives an effect that I have never been able to find elsewhere.  I use it in a controlled fashion, never as a mass-wash slather on type thing; this is a scalpel, not an axe.  

all of these were washed in this mixture


...again, washed in this mixture.


This wash is not a universal tool.  However, it works great on small areas which might otherwise be clogged or obscured by thick store purchased products.  

These are not 15mm, but were done with my homemade washes about 15 years ago.  


Not bad for a painting bumkin back then.

Monday, 5 October 2020

Using Army Painter Dips & Minwax - Tips and Tricks

When using either Army Painter Dips or Minwax Polyshades on miniatures there are a couple of tips that might be helpful to those who are new to those products.  


Model Preparation

Both products will slightly alter the base color underneath, similar to a wash.  This may be desirable.  However, if not you can mitigate this by applying a Gloss Coat prior to varnishing (this is applicable when applying traditional washes as well).  When varnishing vehicles I always add a gloss coat.  The coating allows the varnish to move more easily across the model surface (viscosity) and allows you to remove it if necessary (say on large flat areas or panels....Old Crow vehicle models are a prime example of why you should use a gloss coat) and tends to preserve the original colors more.  


Application

Never dip.  Ever.  Always use a brush.  Start from the top and work down.  You do not need a lot to cover the model.  Using excessive amounts will only increase pooling and your work load as you struggle to remove the pools.  Remember, you can always add more later.  Clean your brush will mineral spirits when done.


Thinning

Both products are rather thick.  This is less of an issue on larger models, but at 1:100 scale or smaller it can become a problem.  Therefore I suggest that you decant whatever amount you are planning to use into a small container, like a paint pot or similar vessel and thin the varnish with mineral spirits (I use Gatorade drink bottle caps after my sons are done with them).  Dollar Store Paint Pots are a perfect choice if you can get them.  Do not thin past 30% or the products will separate and you will have a mess.  I suggest between 10-20%.  Start low and work up if necessary.  Make sure you mix the contents well and periodically during its use.  Use an eyedropper bottle for the mineral spirits.  This prevents you from over thinning and is just easier overall.  


Dry Time

It can take up to one day for either product to completely dry.  This creates delays in completing painting projects.  This may or may not be an issue for you.  If you wish to speed up the process when you can bake your models in an oven at 170 degrees for one hour.  The models will be completely cured and you can continue your project.  Keep in mind that this works best with metal models.  Resin can be cured but thin objects like barrels can possibly warp due to the heat.  You can straighten these without too much difficulty though.  Your Significant Other may not appreciate you using the oven for paint curing.  If so, do it when they are absent, or asleep.  


Matt Varnishing

I do not suggest using Testors Dullcote on models done with either product.  I have found that the Dullcote will create a crackling effect on the varnish surface occasionally.  It does not happen every time and can happen even if the models are fully cured for days.  I only use acrylic varnishes, all sprayed through my airbrush.  Theses products will not negatively interact with the Polyshades/Army Painter varnishes.  Brush on matt varnishes are an option, such as Vallejo or Mig.  


Post Shade Highlighting

After matt varnishing I almost always do a post-shade highlight on select areas of the model.  When highlighting anything I use two colors, layered over each other.  This step is not required but it will make the models pop and add visual appeal.  The exception are vehicles: I use Tamiya Weathering Pigments for all post-shade highlighting needs.  


Minwax Polyshades to Army Painter Equivalents

Army Painter is expensive, especially when it is basically just relabeled Minwax.  I have used both products and found no appreciable difference between the two.  The Minwax equivalents to Army Painter are:

Soft Tone > Pecan

Strong Tone > Antique Walnut

Dark Tone > Tudor


I have found that Tudor works are almost anything and is my go-to for 15mm projects.  Pecan is good for light earth tones and alien skin colors.  Polyshades come in many colors which allows for some interesting effects which cannot be done with Army Painter due to its limited range. 


Tuesday, 16 June 2020

Army Painter Dip or Minwax?


Over the years I have used both Army Painter Dips and Minwax.  Personally, I find very little difference between the two products.  I prefer Minwax Tudor for versatility and price but Army Painter Strong Tone is also an excellent choice for shading earth tones.

However.....if you are considering using Army Painter Dip or Minwax on figures or vehicles I HIGHLY suggest applying a coat of Future Floor Finish or another Gloss Cote of your choice before applying the varnish (not so much on 15mm figures but definitely on vehicles).

The varnish slides off the glossy high spots much easier and generally makes the whole process better (IMO).  Whenever I use the products on uncoated models I always have problems.

You can use mineral spirits to thin if necessary; but don't use too much or the stain will separate and you will have a messy model which will need redoing.


Tuesday, 10 January 2017

Lets Talk Area Terrain

Terrain. To me, an evocative table-top is more important than the miniatures who represent the beings who will fight and die for our amusement.  With the right pieces the mind can be swept away to alien vistas and ancient lands where only the mind may travel.

Sadly, the trend in todays miniature gaming is to use True Line of Sight and what I call "Terrain Micromanagement".  In this environment each piece of terrain is placed on the table and becomes an immovable object; a force that even the gods cannot move.  We then spend much of the game arguing what one can and cannot see from the vantage point of a 25mm tall plastic/metal figure.  Absurd. 

In days gone by, wargames used another system.  The designers knew that the tabletop battlefield was only a vague representation of the actual location.  We need not be concerned with the placement of each tree, rock and bush.  We only need to know what might be in a general area of the battlefield, as indicated by a specific area.  Perhaps a piece of felt, cardboard or MDF would represent this area.  The point is that the zone represented contained a certain type of terrain: rocks, jungle, water or even buildings (yes buildings). Even GW's 40K used such a system in the days of old.  Designers knew that today perhaps your forest area represented but a light wood, whereas next week it may be an impenetrable jungle.  All we need concern ourselves with is how big the area is.


Woods and Rocky Areas

Below are two examples of area terrain and how they can be used on the tabletop: a wooded area and a rocky area.  The area of each is indicated by a piece of flocked MDF.  The pieces of terrain inside this area can be moved around at will, or even removed.  We need not be concerned with their placement.  If a miniature or unit does not fit inside the area we simply remove terrain pieces until they do.  This method allows us to create dioramas and terrain features which are modular and are user friendly.


Rocks found in my backyard, repainted and based on 60mm bases.
These terrain pieces were quite simple and cheap to produce.  Rocks can be found anywhere.  However, they should to be painted if at all possible.  Unpainted rocks on a tabletop simply look like small pebbles or rocks.  Once painted though they become miniature boulders and colossal granite formations.  The best part about rocks is they are free.  Perhaps this rocky area blocks line of sight within 2" of the base?  Perhaps only 1".  The choice is yours.
a rock

a tree
 These are trees from various manufacturers.  I simply glued them onto 40mm bases.  A little flock and they are done.  Maybe these areas are jungles, permitting but 1" of visibility in or out?  Perhaps they are light woods, permitting a 4" line of sight.  The choice is yours.
look, more trees
Area terrain simplifies line of sight, cover and just about everything else associated with vision.  Arguments vanish under it's lawful gaze.  We spend less time arguing and more time playing and hopefully enjoying ourselves together.

Sunday, 8 January 2017

15mm Halo Diorama - a Fathers Christmas Present

This Christmas, my 14 year old (Logan) presented me with a rather peculiar problem: he didn't want anything for Christmas.  Now, some background on him: he has ADHD and Asbergers, so his outlook on things is a bit different from the norm.  Additionally, when he says he does not want anything he really means it.

My wife really looked to me to fill the gift void this  year for him.  The only real hobby he has is Halo: games, books, lego, ect.  Sadly we have collected almost all items which could fall into this category.  So, I thought, is there something I could "do" for him.  Something that he could keep as a memory of Daddy (yes he still calls me this; he is very sentimental as well). 

What could I do.  I don't have many useful skills around the house, so building him something was out.  All I can do with any small skill is paint very small inert things.  Ah-ha!  I can do a diorama I thought.....a Halo one, with Spartans and Elites battling skirmish style, on some alien world.  So, off began this journey (around Dec 10 no less).

Step 1: The Case
The first thing was how to display it.  That was the easiest thing to find: a baseball collectors case off Amazon.  $50 with shipping.  Ouch.  It was just the right size: not too big and not too small. 


Step 2: Background
What kind of background to use.  Well Halo of course.  So, during my lunch hours at work I scoured the internet for Halo landscape pictures.  Eventually I narrowed it down and printed it out on a laser printer.  Trees and rocks were taken from my terrain collection (yay!).  It is handy having lots of stuff in the garage sometimes.  I used a piece of plasti-card as the base, flocking it with Woodland Scenics flock.


Step 3: Models
The models were an easy choice.  The GZG produces a line of 15mm figures which are a spitting image of Spartans: The NI Infantry line.  Two sets of 8 figures were only 5 GBP.  They arrived with one week to spare before Christmas.  Painting crunch time!  I washed the bare models in GW Athonian Camoshade (the green one) and picked out the other details individually.


Now, Covenant figures were a bit harder.  However, Daddy had a plan for this.  About a year ago I purchased a set of Tavshar aliens from 15mm uk.  They are very similar to Covenant elites.  I had not painted them up since they were only a test pack.  However, four models was all I needed.  Through random conversation my son provided me the color scheme to use for the elite: blue for regulars and red for a leader.  Weapons were done in the traditional Covenant Purple.


 The end result is this:

15mm Halo Diorama
 I left everyone unattached to the flocked base since, allowing Logan to reposition the models at will.

Spartans advance!

Spartans

Covenant Elite

Covenant Elite Leader

Covenant Elites


Spartan with Spartan Laser

Logan told me it was the best gift he received.  Looks like I hit the mark on this one.  Not too bad if I do say so myself.

Visitor Total