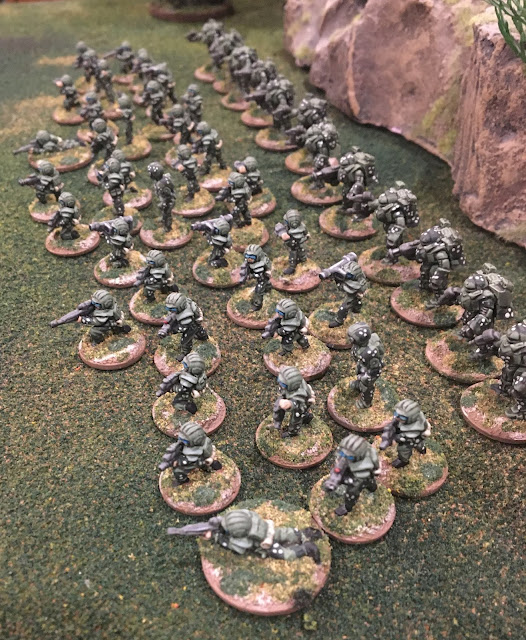
Well another week almost done and another project complete. Lately I have been trying to shake things up a little, breaking out of my comfort zone. So, rather than paint the same old same old I am doing something different: camouflage patterns on an army-level scale.
I have done camouflage on 15mm before. It is not hard, just time-consuming. Typically when I start a project my goal is to get it complete in a timely fashion (aka quick) with a high degree of quality, sticking to what I know works (technique wise..no fancy stuff, just clean painting and a high level of highlighting). That mentality has kept me trapped in a boring routine. No more. His Excellency shall be charting courses into hitherto unknown areas of miniature painting.
The ESU has been on my to do list for years. I even have some of the old models (used as test pieces for different color schemes...they are painted and stripped all the time...poor bastards). The whole force was actually painted last week (in a tan and green pattern). However, upon completion I discovered I was a) way too boring with my scheme and b) the army painter dip was too heavy. So after some reflection I stripped them and instead focused on their power armor. I chose a pattern that I had seen almost a decade ago: Russian Siberian Taiga. To my surprise the pattern came out great. This pattern was then duplicated on a smaller scale across the whole ESU army, creating what you see below. There are several heavy weapons teams which are fully painted but not based (I ran out of MDF bases for the moment).
 |
| GZG ESU Naval Infantry & Black Bear Power Armor |
In prior posts I have indicated that keeping a painting log is important, especially for me. Without one I would never be able to recall what I used for paints. In any case the color pallet was super simple:
- Vallejo Grey Primer, airbrushed
- Vallejo 71.126 IDF/IAF Green Basecoat, airbrushed
- Vallejo 71.018 Black Green Camo spots, hand painted at various areas on clothing only.
- Vallejo 71.249 Sea Grey weapons
- Reaper Khaki Highlight on the sleeping bag
- Vallejo Pale Blue Grey on the visor (to prep it for the next step)
- GW Contrast Tallesar Blue, thinned 1:1, on the visor (to create the blue highlight).
- Reaper Tanned Highlight for all flesh areas.
- Washed in Minwax Polyshades Tudor, thinned 30% with Mineral Spirits. This is important. Decant some in a small plastic jar and thin it.
- Vallejo 71.103 Grey for camo spots, post shade. In groups of 3.
- Reaper Pale Lichen on armor areas for a final highlight.
- Reaper Khaki Highlight again on the sleeping bag
- Matte Sealer.
- Tamiya Flat Earth on the base, drybrushed with Reaper Khaki Highlight
- Woodland Scenics Earth, Mixed Blend and Weed flock.


Another good job Dan.
ReplyDeleteI use a rounded needle to do dots
Much quicker & more accurate than a brush.
Z
Thanks Zune. I am pleased with the outcome. The camo was easy with the brush actually. I listen to Gordon Lightfoot while painting and the time flys by, as does the work.
Delete